Protected

Awards


Blog Hop


Stamps I Love


Facebook Badge
Tuesday, January 18, 2011
 Rockin' Christmas
~Rockin' Christmas~

This tut was written in Photoshop CS5. Any version will work. I assume that you have a working knowledge of PS while using my tuts. Please keep in mind that some keyboard short cuts may be different in other versions.
♥♥♥♥♥♥♥♥♥♥♥♥♥♥♥♥♥♥♥♥♥♥♥♥♥♥♥♥♥♥♥♥♥♥♥♥♥
Supplies Needed:
PTU Rockin' Christmas kit
Template:
None
None
Tube of choice:
I am using Elias Chatzoudis,
Plug-ins Needed:
None
None
♥♥♥♥♥♥♥♥♥♥♥♥♥♥♥♥♥♥♥♥♥♥♥♥♥♥♥♥♥♥♥♥♥♥♥♥♥
~Lets get started~
Open a 600x600 transparent canvas.
Open up Skull scalloped Frame Green_SAV. Scale to about 86.64% Position in center of canvas.
Open up Skull _Filmstrip Red_SAV. Scale to about 74.66% ...... Rotate to about -36.70 degrees. Position to the upper left of the frame.
Open Sparkle Paper_Green_SAV. Position behind skull frame. Scale so it just covers the inside circle of the frame.
Get your magic wand tool and select inside the skull frame.
SELECT >> MODIFY >> EXPAND by 2
SELECT >> MODIFY >> EXPAND by 2
CTRL + SHIFT + I (letter eye)
Be sure you have the paper layer highlighted and under the skull frame layer and do CTRL + X
Open up Sparkle Paper_Red_SAV. Scale so it just fits over the filmstrip.
Get your magic wand tool and click inside one of the squares of the film strip. Hold down the shift key and click in all the remaining squares.
SELECT >> MODIFY >> EXPAND by 2
CTRL + SHIFT + I (letter eye)
Be sure you have the red paper layer highlighted and below the filmstrip and do CTRL + X
you should now have something like this...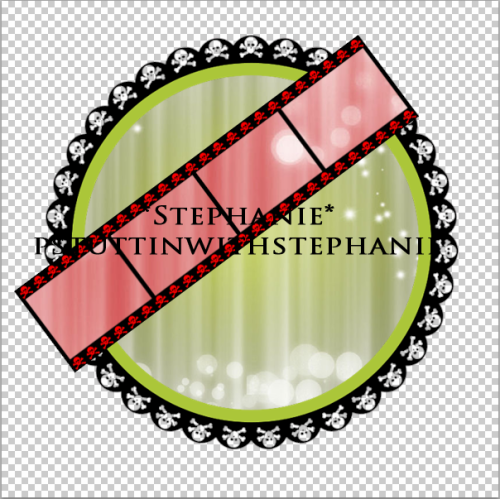
Open Drumset Red_SAV element. Scale to about 78.49% Position to the left bottom, on top of both frames.
Open Foil Green Tree_SAV element. Scale to about 74.99% Position behind drum set.
Open Music Notes_SAV element. Do not scale just position behind green tree.
Open Music Notes3_SAV element. Do not scale just position on top of filmstrip frame. Be sure it is under the green tree layer.
Open up Skull Red_SAV element and position on top of drum set layer. Scale to about 32.12% and center it in the middle of the white drum.
Open up Silver Bells(bright red)_SAV element. Scale to about 19.53% Position on top of filmstrip to the right edge.
Open up Silver Bells(green)_SAV element. Scale to about 19.07%. Position to the bottom left of the filmstrip.
Open Christmas Lights_SAV element. Move this layer under the filmstrips paper layer. Position so that only the right side has lights and erase everything that goes over it. (this is optional in case you use a different tube than I have. If you use the same tube you can't see the lights so you may skip this step)
You should now have something that looks like this...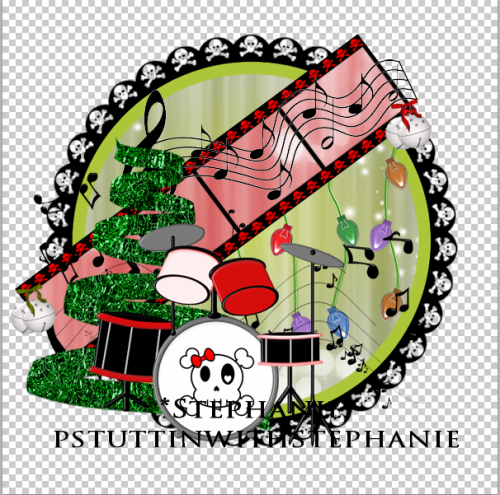
Open up Floral Swirl_SAV element. Do not resize just position under the circle green paper.
Open up Record5_SAV element. Do not resize just position on top of floral swirl to the bottom right but under the green paper.
Open up Record2_SAV element. Do not resize just position on top of floral swirl to the top left but under the green paper.
Open up Gift Box Black_SAV element. Resize to about 43.15% Position to the right of the drum set.
Open up Gift Box White_SAV element. Resize to about 52.69% Move this layer under the black box and to the right of it some.
Open tube and scale to about 88.83% Position to the right.
Use your magic wand tool and click inside the skull frame.
CTRL + SHIFT + I (letter eye)
Highlight your tube layer and erase the bottom part of it so it looks like the tube is inside the skull frame at the bottom.
SELECT >>> DESELECT
Now move this tube layer under the drum set layer. Move your red bells layer if you need to so that it isn't on top of her hair.
Duplicate this tube. FILTER >> BLUR >> GAUSSIAN BLUR set at 2.0
Change your layer style on the duplicated layer to Soft Light.
You should now have something like this...
Open close up of the tube and position on top of the green circle paper layer but under the skull frame layer.
Move the tube so her eyes are just peeking over the filmstrip.
Get your magic wand tool and click inside the skull frame.
SELECT >> MODIFY >> EXPAND by 2
CTRL + SHIFT + I (letter eye)
Be sure your close up tube layer is highlighted and do CTRL + X
Duplicate the close up tube layer and do
FILTER >> BLUR>> GAUSSIAN BLUR set at 2
Change the layer style of the duplicated close up tube layer to Soft Light. Change the original close up tube layer style to Luminosity.
Use whatever parts of the tube you would like and fill in the filmstrip layer just as we did with the skull frame by using your magic wand tool ect. Change the layer style to Luminosity on each one.
Open Green Gradient Snowflakes_SAV element. Resize and position wherever you like.
Open Red Gradient Snowflakes_SAV element. Resize and position wherever you like.
Open Snow Overlay_SAV element. Resize and position to liking.
Open Sparkle Red_SAV element. Resize and position to wherever you like.
Open Sparkle Green_SAV element. Resize and position to wherever you like.
Open Red Merry Christmas word art. Separate the words and add rockin with the symphony font and position however you like.
Add drop shadow to your elements, tube, frames and anything you like.
Add your copyright, license info and your name.
I hope you enjoyed this tutorial!

Subscribe to:
Post Comments (Atom)
My Time
Get your own Digital Clock

Networked Blogs
Grab My Blinkie


I CT for


Places I Like


0 comments:
Post a Comment