Protected

Awards

Blog Hop


Stamps I Love


Facebook Badge
Tuesday, January 18, 2011
 Blueatiful Time
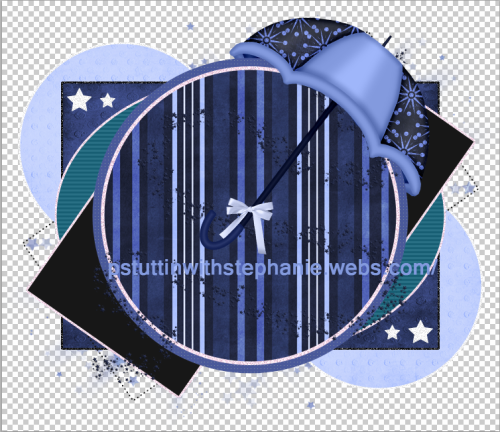
~Blueautiful Time~

This tut was written in Photoshop CS5. Any version will work. I assume that you have a working knowledge of PS while using my tuts. Please keep in mind that some keyboard short cuts may be different in other versions.
♥♥♥♥♥♥♥♥♥♥♥♥♥♥♥♥♥♥♥♥♥♥♥♥♥♥♥♥♥♥♥♥♥♥♥♥♥
Supplies Needed:
PTU So blue kit
you can purchase this kit
Template:
I am using Temp #161 by Kristin
I am using Temp #161 by Kristin
from Toxic Desirez
Tube of choice:
I am using the art of Zindy S. D. Nielsen
You can purchase her tubes and license at Zindy Zone Shop
close ups are best and one full body.
Font:
MeaCulpa
MeaCulpa
Plug-ins Needed:
None
None
♥♥♥♥♥♥♥♥♥♥♥♥♥♥♥♥♥♥♥♥♥♥♥♥♥♥♥♥♥♥♥♥♥♥♥♥♥
~Lets get started~
Open template. Turn the eyes off or delete the credits, pixel words, glitter stars and skull layers.
Open wd_sb_pp3 paper. Scale to just fit over the whole canvas. Move this layer below the star background layer.
Hold CTRL key and click on the preview window of the star background layer.
CTRL + SHIFT + I (letter eye)
Highlight the paper layer and do CTRL + X
Turn the eye off the pink star background layer or delete it.
Highlight the left circle layer.
Open wd_sb_pp6 paper. Move to canvas and scale to just fit over that left circle.
Move pp6 paper under the left circle layer.
Hold CTRL key and click on the preview window of the left circle layer.
CTRL + SHIFT + I (letter eye)
Highlight the pp6 layer and do CTRL + X
Turn the eye off the left pink circle layer or delete it.
Duplicate the pp6 circle layer and move it over to the right pink circle. Use your keyboard up and down keys to be more precise on getting it center just over the pink circle.
When done moving it into place, you may now turn the eye off or delete the right pink circle.
Open wd_sb_pp7 and move it to your canvas. Scale to just fit over the pink rectangle layer.
Move pp7 layer below the pink rectangle layer.
Hold your CTRL key and click on the preview window of the pink rectangle layer.
CTRL + SHIFT + I (letter eye)
Highlight the pp7 layer and do CTRL + X
Turn the eye off or delete the pink rectangle layer.
Highlight the oval layer.
Go to IMAGE >> ADJUSTMENTS>> HUE AND SATURATION
Change the HUE to - 131 and the lightness to - 43
Highlight the Oval glitter layer and change the hue and saturation to your liking.
Open wd_sb_pp11 and move to canvas.
Scale to just fit over the pink circle 2
Do the same as we have been doing above to put the paper in the circle.
Turn the eye off or delete the pink circle 2 layer.
Highlight the glitter circle and change the hue and saturation to your liking.
Highlight the pink circle 1 layer.
Go to hue and saturation again and change the hue to - 94 and lightness to - 39
Now on to some elements...
Open wd_sb_el14 and move to canvas
Scale to about 14.73% and move this layer above the stripped circle paper layer.
Position that to your liking.
Open wd_sb_el24 and move to canvas.
Scale to about 18.17% and rotate 7.63 degrees.
Duplicate and move one of them under the circle 1layer.
Highlight the top one and erase the bottom part of the umbrella so that it looks like it is hanging off the circles. You should have something that looks like this...
NOTE: I wound up erasing the handle after doing the ex so feel free to do so or leave like this. It is up to you how you want it to look.
Open wd_sb_el9 and move to canvas.
Scale to liking and position under the top umbrella layer.
Open wd_sb_el11and move to canvas.
Scale to about 25.03% or to liking and move on top of the blue rectangle paper layer.
Position in to the top left.
Duplicate, flip horizontal and then vertical. Move to the right bottom of the blue rectangle paper.
Open tube of choice. (close up is best) Move to canvas.
Position this layer above the stripped blue circle but below the umbrella and the el9 layers.
If you are using the same tube as me, you will notice that the tube is a bit smaller than the circle at the top and bottom. No worries. We will worry about that later.
Move tube to your liking and position inside strip circle as we did above with all the other papers.
Duplicate this tube layer and go to FILTER>> BLUR>> GAUSSIAN BLUR set at 2.0
Change the layer styler on the duplicated blurred layer to Soft light.
Change the original tube layer style to Lighten.
You should now have something that looks like this.

Open your second close up tube.
Move it under the left black rectangle. If you are using the same one as me, do a horizontal flip.
Position it so that the face is mostly visible. Do the same as we did above and add the tube into the rectangle. Add the Gaussian blur just like we did before. Change the duplicated blurred layer style to soft light.
Change the original tubes layer style to screen.
Duplicate these two tube layers then link them together. Then highlight all 4 of those layers and duplicate it. Then do horizontal flip and move into the right black rectangle, except move it over more so that the other eye of the tube shows more.
Move all 4 of those layers Under the right black rectangle layer.
CTRL + click on the preview window of the right black rectangle.
CTRL + SHIFT + I (letter eye)
Highlight the first tube layer and do CTRL + X
Keep doing this to the other 3 layers so that all the excess is gone.
Move these 4 layers back on top of the right black rectangle.
Highlight the glitter rectangle layer and change the hue and saturation to your liking. Be sure you do this to both the right and the left ones.
Open up your full body tube, scale to liking and position to bottom left.
Duplicate and add your Gaussian blur and change the layer style to soft light.
Add your Blueautiful Time text to the top left.
Add drop shadow to the main parts of the temp, to the full body tube and any elements.
Add your name, copyright and license info.
I hope you have enjoyed this tut! Please message me with your results.

Subscribe to:
Post Comments (Atom)
My Time
Get your own Digital Clock

Networked Blogs
Grab My Blinkie


I CT for

Places I Like


2 comments:
Love this is tooo freakin cute but u no Im big fan of ur work babe!
Awww thanks so much hun :D
Post a Comment