Protected

Awards


Blog Hop


Stamps I Love


Facebook Badge
Tuesday, January 18, 2011
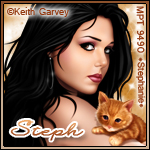
 Pussy Cat Forum Set
~Pussy Cat Forum Set~

This tut was written in Photoshop CS5. Any version will work. I assume that you have a working knowledge of PS while using my tuts. Please keep in mind that some keyboard short cuts may be different in other versions.
♥♥♥♥♥♥♥♥♥♥♥♥♥♥♥♥♥♥♥♥♥♥♥♥♥♥♥♥♥♥♥♥♥♥♥♥♥
Supplies Needed:
Scrap Kit:None ... just find and use any sparkles of choice.
Tube of choice. I am using Keith Garvey. You must purchase a license to
use his work. You can do so at MyPSPTubes
use his work. You can do so at MyPSPTubes
Texture: tagging texture set 2 by Vixpsp
Font of choice. I am using Times New Romance & Quillin Script Thin
Plug-ins Needed:
None
♥♥♥♥♥♥♥♥♥♥♥♥♥♥♥♥♥♥♥♥♥♥♥♥♥♥♥♥♥♥♥♥♥♥♥♥♥
~Lets get started~
Open a new canvas size 600 wide x 250 height (pixels) with a transparent background.
Open up texture 11 from Vixpsp textures. Resize to about 75.58 to 76 %
Edit >> Transform >> Flip Horizontal
Image >> Adjustment >> Hue and Saturation *Be sure to check the colorize box*
Mess with the sliders to get a color as close to a color from your tube as you can. If colorize doesn't work well try doing it with the colorized box not checked. Sometimes you can get a different effect.
Here are my settings to match the Garv tube I chose:

On your layers preview you should have layer 1 and layer 2(your texture layer). Move layer 1 above layer 2 texture layer.
Change your foreground color to a lighter color from your tube and change your background color to a darker color from your tube.
Get your gradient tool and in the drop down menu be sure you are clicked on foreground to background gradient.
Here is an example of how it should look on the gradient bar:
Click and drag gradient tool horizontal in center of your canvas. Do edit undo until you get the gradient you like.
Mine looks like this.

Take your rectangle marquee tool and cut out a rectangle to leave a border that looks something like this.

Edit >> Stroke
change the width to 2px , color black, Location center, blending mode normal, Opacity 100% & preserve transparency box UN checked.
Drag and drop your close up tube of choice onto your canvas. Resize to your liking and position to the left.
Duplicate that tube and on your duplicate layer go to Edit >> Gaussian blue set at 2.0.
Change the duplicate blurred tube layer to soft light.
Drag and drop your smaller tube onto the canvas and move that layer under your original close up tube layer.
Duplicate this tube two times and position them to your liking.
Duplicate each one after you position them and change the blend mode to soft light. Merge the soft light layer down onto each original layer.
Change the Opacity of those three layers to 30%.
Go back on each layer and erase any part of each tube that over laps the next tube. Merge these three layers together. It should look something like this.

Get your text tool and in Times New Romance font size 72 type out Pussy and position to the right or to your liking. Now type out Cat and position more to the right and under Pussy.
Move these layers under the three tube layers we merged. Right click the text preview window of pussy. Highlight the merged tube layer and do CTRL+X then CTRL + V. Move it so that it fits back into place where you cut it out.
Add stroke at 2 color set to a85015 and add drop shadow to your liking. Turn the eye off or delete the original text layer.
Do this same exact step for the Cat font layer.
Get your text tool again and type out I love in Quillin Script Thin font size 48. Be sure to change it to Bold. Then type out my in the same font. Position to your liking or to how I have in finished set. Change font color to your liking.
Open up sparkles of choice and position on top of merged tubes layer.
Add your name(I added a gradient overlay, stroke and drop shadow) and copyright/license number.
Now for the avatar
Open a new canvas 150x150.
Drag and drop texture we made from set earlier onto the avi canvas. Position to your liking.
Add you gradient border just as we did earlier above EXCEPT, you will need to go vertical with your gradient tool this time. Also when you add your stroke drop it down to 1px instead of 2.
Now drag your close up tube from set earlier onto the avi. Be sure to highlight both layers so that you are dragging them both with you to the avi.
Resize tube to about 43.48% or to your liking. Position those two tube layers under the border layer.
Drag and drop your sparkles from earlier onto avi and position to liking under the two tube layers.
Add your initials, shorter name or however you would like to the avi.
Add your copyright/license number.
You are now finished!
I hope you have enjoyed this tut!

Here is an ex sent in by Sandra...

Amazing job hun. Thank you for doing my tut :)
Subscribe to:
Post Comments (Atom)
My Time
Get your own Digital Clock

Networked Blogs
Grab My Blinkie


I CT for


Places I Like


0 comments:
Post a Comment