Protected

Awards


Blog Hop


Stamps I Love


Facebook Badge
Saturday, April 16, 2011
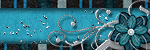
 Dream
Dream

This tut was written in Photoshop CS5. Any version will work. I assume that you have a working knowledge of PS while using my tuts. Please keep in mind that some keyboard short cuts may be different in other versions.
♥♥♥♥♥♥♥♥♥♥♥♥♥♥♥♥♥♥♥♥♥♥♥♥♥♥♥♥♥♥♥♥♥♥♥♥♥
Supplies Needed:
PTU Vampire Diaries kit by Polka Dot Scraps
from PMT w/ S
Template:
None
Tube of choice:
I am using artwork of Arthur Crow.
I am using artwork of Arthur Crow.
You must have a license to use his work.
You can purchase his work and license
Font:
Of choice
Masks:
of choice
Plug-ins Needed:XERO - FRITILARYALIEN SKIN XENOFEX 2 - CONSTELLATION
FLAMING PEAR - FLOOD
♥♥♥♥♥♥♥♥♥♥♥♥♥♥♥♥♥♥♥♥♥♥♥♥♥♥♥♥♥♥♥♥♥♥♥♥♥
~Lets get started~
Open a new canvas 600x600.
Open frame three and move to canvas.
Scale to about 89.26% and center it.
Open the scatter element and move to canvas.
Do not scale just position/ duplicate to liking.
Open ribbon 1, move to canvas, and scale to about 73.73%. Position this layer under the scatter elements to the top of the right frame.
Open paper 7, move to canvas, and scale to just cover all of the squares in the frame.
Get your magic wand tool and click inside one of the squares. Hold the SHIFT key and click in the remaining squares.
Go to SELECT>> MODIFY>> EXPAND by 4
CTRL + SHIFT + I
Highlight the paper layer.
CTRL + X
FILTER>> XERO>> FRITILARY
Settings at 5,30,10,0
FILTER>> ALIEN SKIN XENOFEX 2>> CONSTELLATION
settings at 0.03, 3, 5, 1, 100, 82
Twinkle rotation 45, Keep original image
Open swirl 1 element, move to canvas, and scale to just fit the bottom part of the square frames as seen on mine.
Open the crow element, move to canvas, scale to liking and position on top of the swirl one element to the left.
Open your mask of choice. Move this to the very bottom of all the layers.
Position to liking.
Now depending on your mask of choice this may or may not look good on yours.
Go to FILTER>> FLAMING PEAR>> FLOOD
settings at 60, 0, 57, 50, 40, 50, 42, 25, 0, 33, 40
Take a soft brush eraser tool and erase the parts it made that goes over the edges.
You should now have something that looks like this...

Open tube of choice..the close up part. Move to canvas.
Move this layer under the square frames layer. Move it so the face part is showing through the upper right square.
Insert into the frame just as we did earlier with the paper.
Duplicate it now and go to FILTER>> BLUR>> GAUSSIAN BLUR set at 2.0
Change the layer style to soft light.
On the original tube layer change that layer style to Luminosity.
Insert what ever other parts of the tube you would into the rest of the squares.
Be sure to add your blur and change the layer styles just as we did with the first one.
I wound up making the bird a bid smaller in the end.
Add whatever elements you would like.
Add drop shadow to any elements etc you want.
Add your copyright, license number, and name.
I hope you have enjoyed this tut.
If you have any questions please feel free to comment or email me.
Subscribe to:
Post Comments (Atom)
My Time
Get your own Digital Clock

Networked Blogs
Grab My Blinkie


I CT for

Places I Like


0 comments:
Post a Comment