Protected

Awards


Blog Hop


Stamps I Love


Facebook Badge

Friday, February 11, 2011
 Innocent...Like a Virgin


This tut was written in Photoshop CS5. Any version will work. I assume that you have a working knowledge of PS while using my tuts. Please keep in mind that some keyboard short cuts may be different in other versions.
♥♥♥♥♥♥♥♥♥♥♥♥♥♥♥♥♥♥♥♥♥♥♥♥♥♥♥♥♥♥♥♥♥♥♥♥♥
Supplies Needed:
PTU collab kit Like A Virgin
from PMT w/ S
Template:
Collab temp by Aqua and Tonya
Collab temp by Aqua and Tonya
(spank me I like it)
Tube of choice:
I am using artwork of Zindy Nielsen.
You must have a license and
have purchased this tube to use it.
You can get it at Zindy Zone Shop
Font:
Of choice
I used Virgin and Waterfalls
Masks:
None
Plug-ins Needed:
None
None
♥♥♥♥♥♥♥♥♥♥♥♥♥♥♥♥♥♥♥♥♥♥♥♥♥♥♥♥♥♥♥♥♥♥♥♥♥
~Lets get started~
Open template
Turn off the eye or delete the credits layer, wordart layers and pixel text.
Highlight your rectangle 1 layer.
Double click on this layer or go to LAYER>> LAYER STYLE>> GRADIENT OVERLAY
Click on the gradient bar and choose one with three colors.
Click on the first bottom square. Then click where it says color to change the color.
Choose a color from the kit.
Do the same for the other two bottom square, choosing two different colors from kit.
Click ok. Then change the angel to 10.
Press ok.
Right click on this layer and copy layer style.
Right click on rectangle 2 layer and paste this layer style.
Double click on rectangle 2 layer and click on gradient overlay.
Double click on rectangle 2 layer and click on gradient overlay.
Change the angle to -171.
Press ok
Open sb_pmt_like-a-virgin_pp11 paper.
Move to canvas and scale to just fit over grad rectangle layer.
Hold the CTRL key and click on the preview window of grad rectangle layer.
Move your paper layer under the grad rectangle layer.
CTRL + SHIT + I
CTRL + X
Move your paper layer back on top of grad rectangle layer.
Open tk-lacey-peach paper and move to canvas.
Scale to just fit over grad circle 1.
Insert the paper in the circle just as we did with the one above.
Move it back on top of the circle.
Duplicate the new circle paper and move it on top of the other circle.
Highlight the dotted rectangle layer.
Right click on the preview window and select pixels.
EDIT>> FILL ... change the drop down menu to color. Choose a color from the kit.
SELECT>> DESELECT
Open tk-framefeather-pink.
Move to canvas and scale to about 72.84%
Then go to EDIT>>FREE TRANSFORM
Click and hold the middle square on the transform bar and drag it up.
It should look something like this..
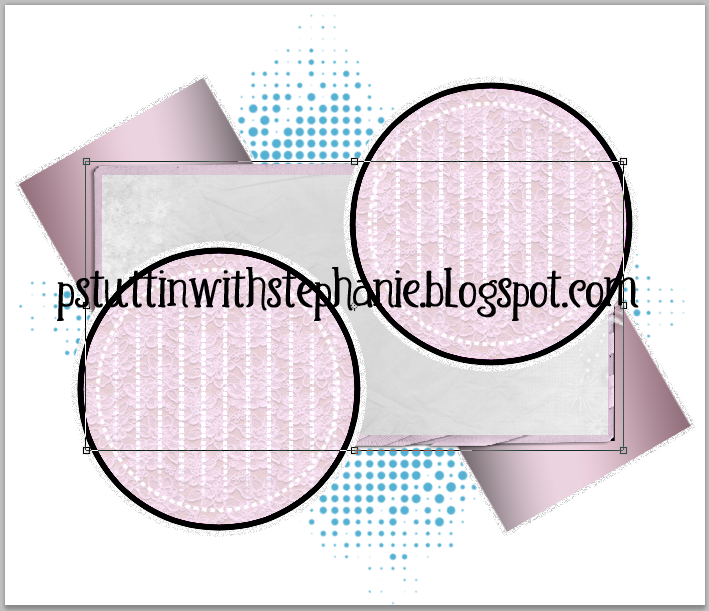
Move this layer under the dotted rectangle layer.
Turn the eye off or delete the black rectangle layer.
Open sb_pmt_like-a-virgin_frame 1.
Move to canvas and scale to about 71.10%
Move under the white glitter circle 1 layer.
Duplicate and move under the white glitter circle 2 layer.
Open sb_pmt_like-a-virgin_frame 3.
Move to canvas and scale to about 91.90%
Move under the half tone layer.
Erase the bottom square part of the frame.
Position to the top left some.
Duplicate this layer.
EDIT>> TRANSFORM>> HORIZONTAL FLIP.
EDIT>> TRANSFORM VERTICAL FLIP.
Position to the bottom right some.
It should look something like this.

Open sb_pmt_like-a-virgin_pearls
Move to canvas, do not scale. Move under the two previous layers we just added.
Position to bottom. Duplicate, vertical flip and horizontal flip. Position to top.
Open sb_pmt_like-a-virgin_feather 3
Move to canvas and move this layer on top of rectangle 2 layer. Position to the right.
Duplicate and move this layer on top of rectangle 1 layer.
Horizontal flip and position to the left.
It should look something like this...

Open sb_pmt_like-a-virgin_scatter 1
Move to canvas do not scale.
Move this layer on top of the dotted circle 1 layer.
Duplicate and vertical flip. Move this layer on top of dotted circle 2 layer.
Open sb_pmt_like-a-virgin_scatter 2
Move to canvas do not scale.
Move this layer under the frame that we put under the white glitter circle 1 layer.
Position to the top left of the rectangle layer.
Duplicate and flip horizontal. Position to the right bottom of the rectangle layer.
Highlight the half tone layer. Right click on the preview window and select pixels.
EDIT>> FILL .. click color in the drop down menu. Choose a color from the kit.
SELECT>> DESELECT
Lower the opacity to about 34%
I wound up moving this layer to the very bottom.
Open tube of choice.
Scale if need be. Position on top to the left on the bottom circle.
Duplicate the tube, FILTER>> BLUR>> GAUSSIAN BLUR set at 2.0
Change the layer style to soft light. Merge down.
Duplicate once more. Double click the duplicated layer and go to color overlay.
Change the color to a darker color from the kit.
Change the blend move to Overlay.
Press ok.
Open close up tube and move to canvas.
Position under the dither brush 2 layer but on top of the circle paper we made earlier.
Do not resize the close up tube if your using the same one as me.
Insert the tube into the circle just as we did with the paper earlier.
You will have to move the tube layer under the paper for the mean time to do that just be sure that you put it back where just stated.
Once you do that duplicate the tube layer and add your Gaussian blur like we did with the other tube.
Change the layer style to soft light.
Change the original tube layer to Luminosity.
I wound up moving the flowers over to the right a bit as to not cover her eyes and mouth.
Lower the Opacity of both those closeup tube layers to about 63%
Chose your font to add your word art.
Type out Innocent...
Move this word art under the full body tube layer. Position to top left.
Duplicate and on the bottom one right click on the layer and raster type.
Select the pixels. SELECT>> MODIFY>> EXPAND by 2
EDIT>> FILL .. change the drop down menu to color. Choose a color from your kit.
SELECT>> DESELECT
FILTER>> NOISE>> ADD NOISE
set the amount at 30% Uniform and monochromatic checked.
Add drop shadow to this layer.
Now make Like a Virgin word art.
Do the same as we did above with the innocent.
Add drop shadow to any main parts of the template, full body tube and elements.
Add your name, copyright info and license number.
I hope you have enjoyed this tut!

Sunday, February 6, 2011
AWESOME!!
WOOWWEE what an awesome half time show that was!! BEP rocked it!!
Wednesday, February 2, 2011
NOTE about conversion tuts...
These tuts will not be offered to my always list or exclusives out of respect of the original creator. If you wish to have one of these tags, you must contact the creator of the original tut to see if they will make you one or add you to their always list.
Thanks for understanding.
<3
Conversion Tut - Love Is

This tut was written in Photoshop CS5. Any version will work. I assume that you have a working knowledge of PS while using my tuts. Please keep in mind that some keyboard short cuts may be different in other versions.
♥♥♥♥♥♥♥♥♥♥♥♥♥♥♥♥♥♥♥♥♥♥♥♥♥♥♥♥♥♥♥♥♥♥♥♥♥
***This is a conversion tut. It was originated By Sarah from Shadow Creations
She gave me permission to convert her psp tut into photoshop along with a few subtle additions***
Supplies Needed:
FTU Love Is kit
Template:
None
None
Tube of choice:
I am using artwork of Anna Marine
You must have a license and
have purchased this tube to use it.
You can get it at CDO or have had it from CILM
Font:
Of choice
Masks:
I used Mask 10 by Horse Play's Pastures
Plug-ins Needed:
None
None
♥♥♥♥♥♥♥♥♥♥♥♥♥♥♥♥♥♥♥♥♥♥♥♥♥♥♥♥♥♥♥♥♥♥♥♥♥
~Lets get started~
Open a new 600x600 transparent canvas.
Open frame 8 from elements. Move to canvas and rotate CW 90 degrees.
Scale to about 88.34% and center on canvas.
Open paper of choice from kit and drag to canvas.
Scale to just fit over frame. Move this layer under the frame layer.
Highlight the frame layer. Get your magic wand tool and click inside the frame.
SELECT>>MODIFY>>EXPAND by 5
Highlight the paper layer.
CTRL + SHIT + I
CTRL + X
Open tube of choice and move to canvas. Scale to liking.
Duplicate tube and FILTER>> BLUR>> GAUSSIAN BLUR set at 2.0
Change the layer style to soft light.
Open scattered hearts 2 element and move to canvas.
Scale to about 75.66%
Position to bottom of tube and frame.
Open flower line and move to canvas. Scale to about 53%
Position on top of the hearts at bottom of tube and frame.
Open forget me not 1 and move to canvas.
Scale to about 27.37% and move to bottom left.
Open forget me not 4 and move to canvas.
Scale to the same as the previous flower and move to bottom right.
Open heart swirl 2 and move to canvas.
Move this layer under the tube layers but above the frame layer.
Don't scale just position to the right top of the frame.
Open the mask and move to canvas.
(this is a psp format mask so u need to get it changed into ps format)
Move this layer to the very bottom.
Scale mask to liking.
Open paper of choice from kit and scale to just cover the mask.
Move this paper layer under the mask layer.
CTRL + click on the preview window of the mask layer.
CTRL + SHIFT + I
Be sure your paper layer is highlighted
CTRL + X
Move the paper layer on top of the mask layer.
Turn the eye off the original mask layer.
Duplicate the new mask layer as much as you want to get it a little darker.
Merge the layers together when your done duplicating them.
Open whatever wordart from the kit you like and position it to the bottom left.
Add drop shadow to any elements you like, the frame and tube.
Don't add shadow to the wordart or it will make it to dark looking.
Add your name, copyright info and license number.
Crap as you wish. If you want to get some of the extra blank canvas off.
Thank you to Sarah for allowing me to convert this tut for PS users!
I hope you enjoyed it!
Espresso Myself -- for always list AND Exclusive list

I didn't make this into a tut but figured I would offer them to everyone this time. I had fun making this one especially. I looved the kit! Please check the Always list/Exclusive PU section on the directional for more info on where to get your tags. I hope you all enjoy them! <3
Tuesday, February 1, 2011
Who's Ur Nurse Pickups
Always list Who's Ur Nurse pickups are ready.
Check the Always list/Exclusive PU section to find where to pick them up.
Who's Ur Nurse

This tut was written in Photoshop CS5. Any version will work. I assume that you have a working knowledge of PS while using my tuts. Please keep in mind that some keyboard short cuts may be different in other versions.
♥♥♥♥♥♥♥♥♥♥♥♥♥♥♥♥♥♥♥♥♥♥♥♥♥♥♥♥♥♥♥♥♥♥♥♥♥
Supplies Needed:
PTU Whos Ur Nurse kit
Template:
PBs Template 89 - Punky Butts
PBs Template 89 - Punky Butts
Tube of choice:
I am using artwork of Jose Cano
You must have a license and
have purchased this tube to use it.
You can get it at Mypsptubes
Font:
Of choice - I am using Grinched
Bling/s:
None
None
Plug-ins Needed:
Eye Candy 4000 - Smoke
Eye Candy 4000 - Smoke
♥♥♥♥♥♥♥♥♥♥♥♥♥♥♥♥♥♥♥♥♥♥♥♥♥♥♥♥♥♥♥♥♥♥♥♥♥
~Lets get started~
Open up PBs template. Turn off the eye or delete the credits layer.
off the hearts and the wordart layers.
Open paper 28, move to canvas and scale to just fit over the black square.
Move this paper layer under the black square layer.
CTRL + click on preview window on the black square layer.
CTRL + SHIFT + I
Be sure your paper layer is highlighted.
CTRL + X
Move the paper layer back on top of the black square layer.
Add your Eye Candy 4000 smoke at these settings..


IMAGE>>CANVAS SIZE and change the width to 720 and height to 550
Highlight all layers and move everything so it is center.
Get a soft eraser and erase the hard edges on the smoke.
Open paper 37, move to canvas and duplicate. DO NOT resize.
Turn the eye off of one of them. Move the other one under either the right or left black circle.
Insert it into the black circle just as we did above with the previous paper on the black rectangle.
Turn the eye back on, on the second paper and add it into the other circle.
Move these papers on top of each black circle.
You should now have something like this...
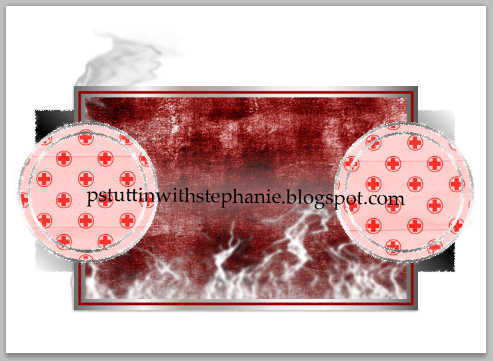
Crop your canvas.
Open el16 and move to canvas. Position at the top on the red line.
Open el15 and horizontal flip it. Move it to the bottom red line.
Open el53, move to canvas and scale to about 51.87%
Move on top of left circles and position to bottom left.
Open el68 and move to canvas.
Scale to liking, duplicate as many as you like and position where you like.
Open tube of choice. (Close up)
Scale if need be. Move this layer under the square frames layer. Duplicate.
FILTER>>BLUR>> GAUSSIAN BLUR set at 2.0
Change layer style to soft light. Merge down.
Duplicate this layer once more and move one of these layers on the top of all the other layers.
Take your eraser and on the top tube layer erase the bottom so it looks like that part is under the frame and under the wavy lines.
Be careful what you erase because you want her arm and upper part to be on top of everything.
It should look something like this...

Open the fuller body tube and place this layer under the bottom half body tube from earlier.
Something like this...

Erase the top part that shows outside the frame. Duplicate the tube, add your Gaussian blur like we did above and change the layer style to soft light. Now change the original layer to Luminosity.
Add whatever other elements that you would like.
Go to the original black rectangle layer and add your eye candy 4000 smoke again EXCEPT change the direction to 327 and the side taper to 0.58
Go to the gradient rectangle layer and do free transform and resize to liking. Change the opacity to 75%
Feel free to add any parts of the tubes body into the circles if you wish.
Add drop shadow to any elements you want, the main parts of the tube and your main template parts.
Add your copyright info, license number and you name.
I hope you have enjoyed this tut!
Exclusive Kat Eyes pickups...
I decided to make the Kat Eyes tut exclusive only! In other word, for follows only. If you want to get exclusives be sure to follow me! If you are already following me and also want to be on my always list, send me an email with the name you would like on your tags.
Check the Always list/Exclusive PU section for info. on where to get your tags!
NOTE: If you are a follower, please send me an email as well with the name/names you would like on the tags. I went by the name that showed up for these ones. So if this is not correct or you want something different let me know.
Sunday, January 30, 2011
Under the weather..
I will have the Kat eye exclusives posted probably Monday. I am a bit under the weather and feeling like total crap. Sorry for the delay!
Subscribe to:
Posts (Atom)
My Time
Get your own Digital Clock

Networked Blogs

Grab My Blinkie


I CT for


Places I Like


